Make the big decisions while they are still cheap
Architects decide what a building needs, how big each part is and what connects to what before a single wall exists. Walls come last. The planning workspace gives a home that same order.
Change your mind at the brief and it costs a sentence. Change it after the walls are drawn and it costs a redraw. Planning first moves the big decisions to where they are cheap.
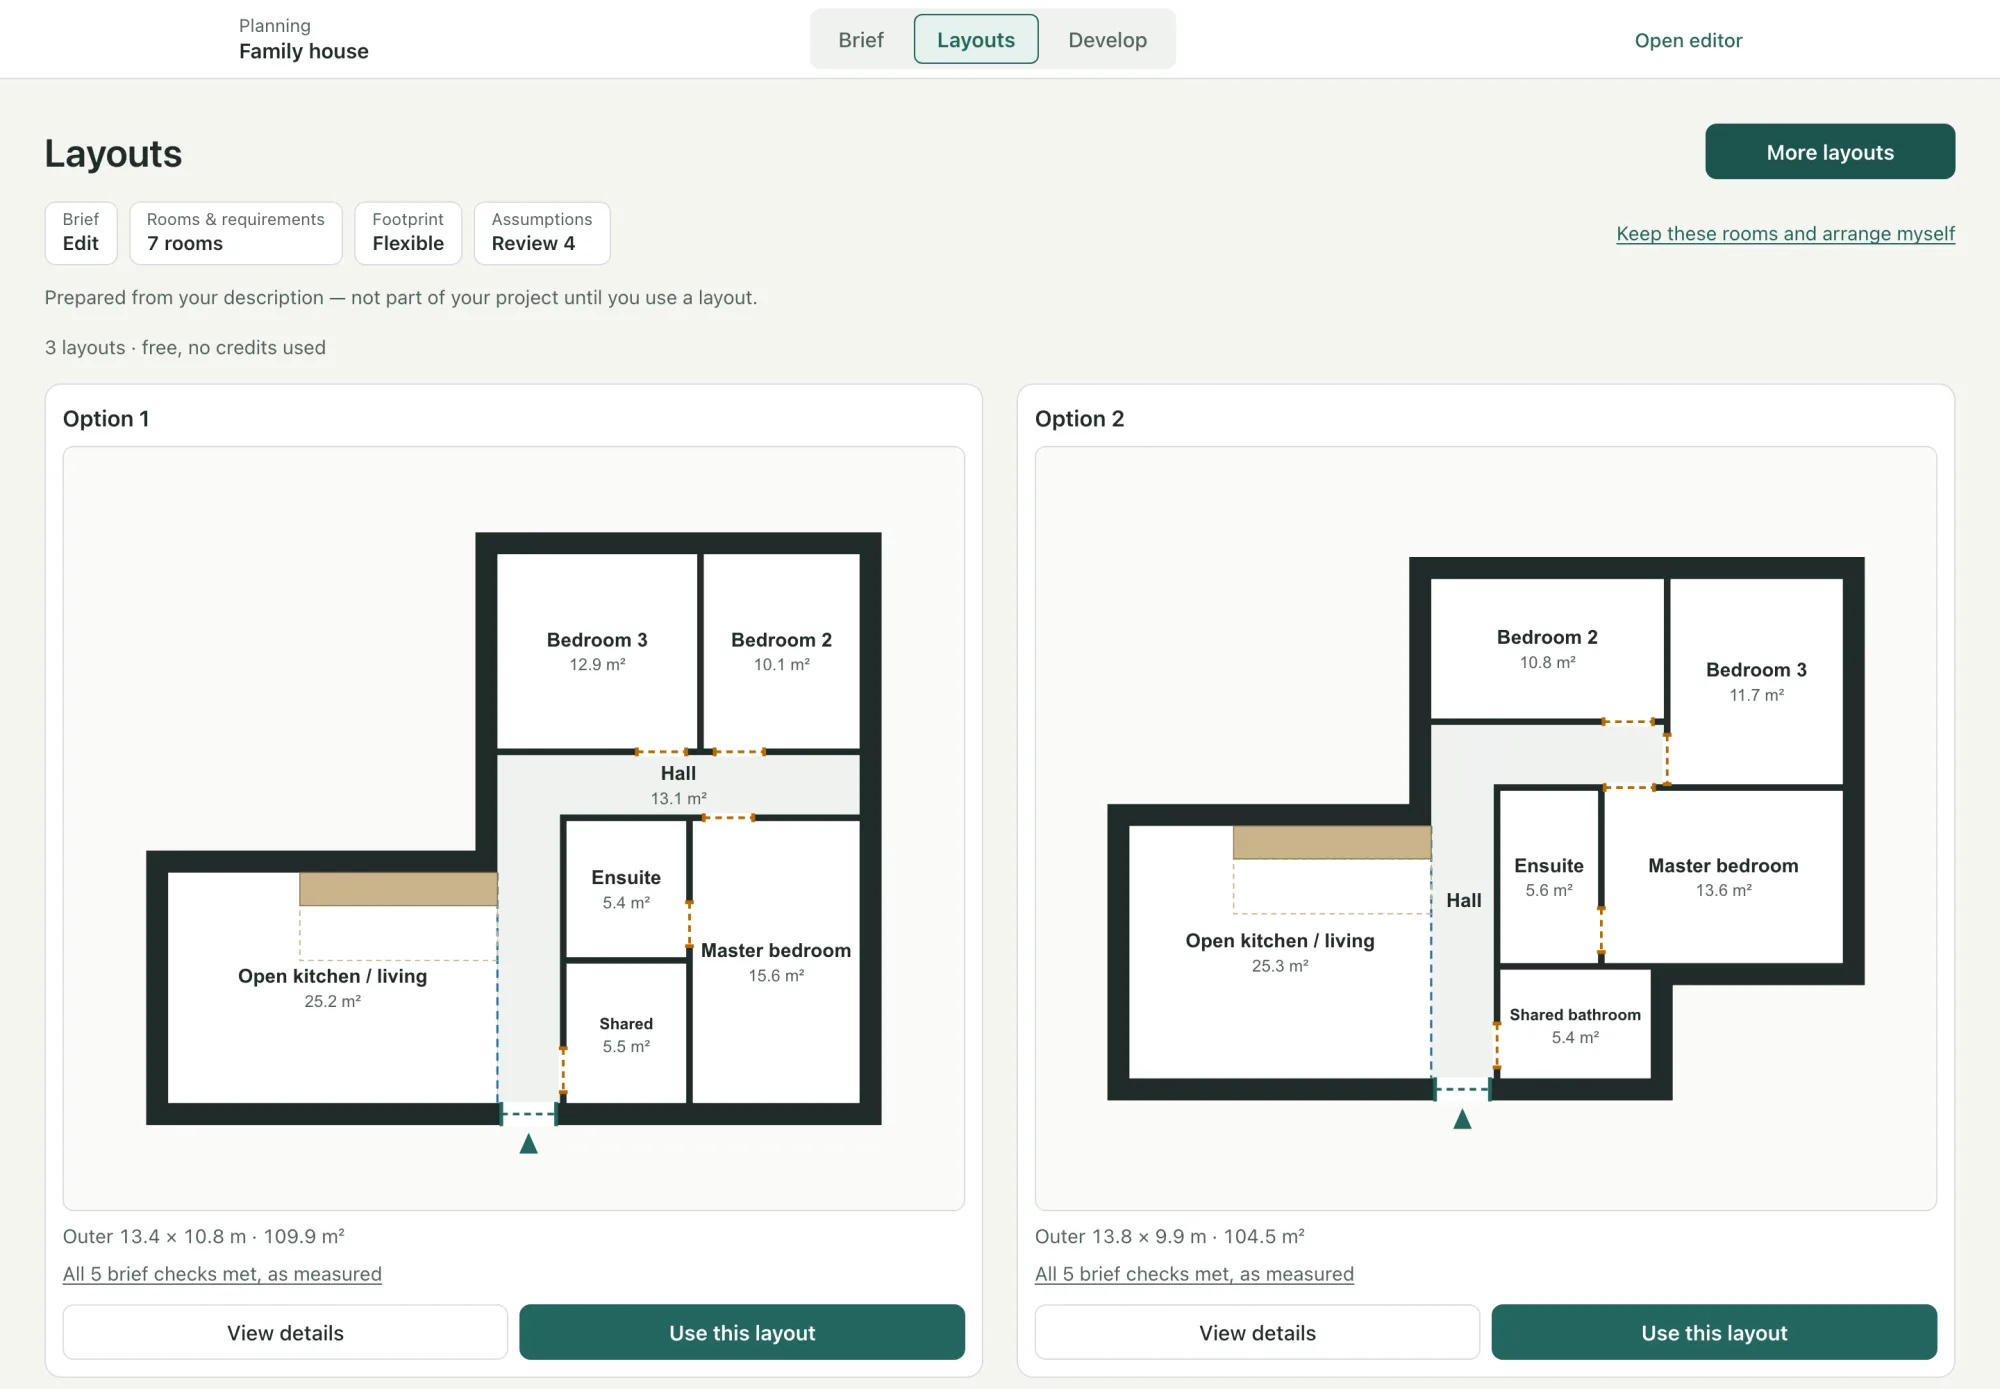
See the same rooms arranged several ways, each with its outside size, floor area and the checks it passes. You choose with the alternatives in front of you, not from memory.
A layout is a starting point. Move a room, keep the ones you like and rework the rest, or draw the spaces yourself. Every step can be undone.
From a description to a floor plan in four steps
One workspace with three stages, Brief, Layouts and Develop, and a Build button at the end. Go back to any stage at any time; a change never silently throws away what you drew.
Describe the home
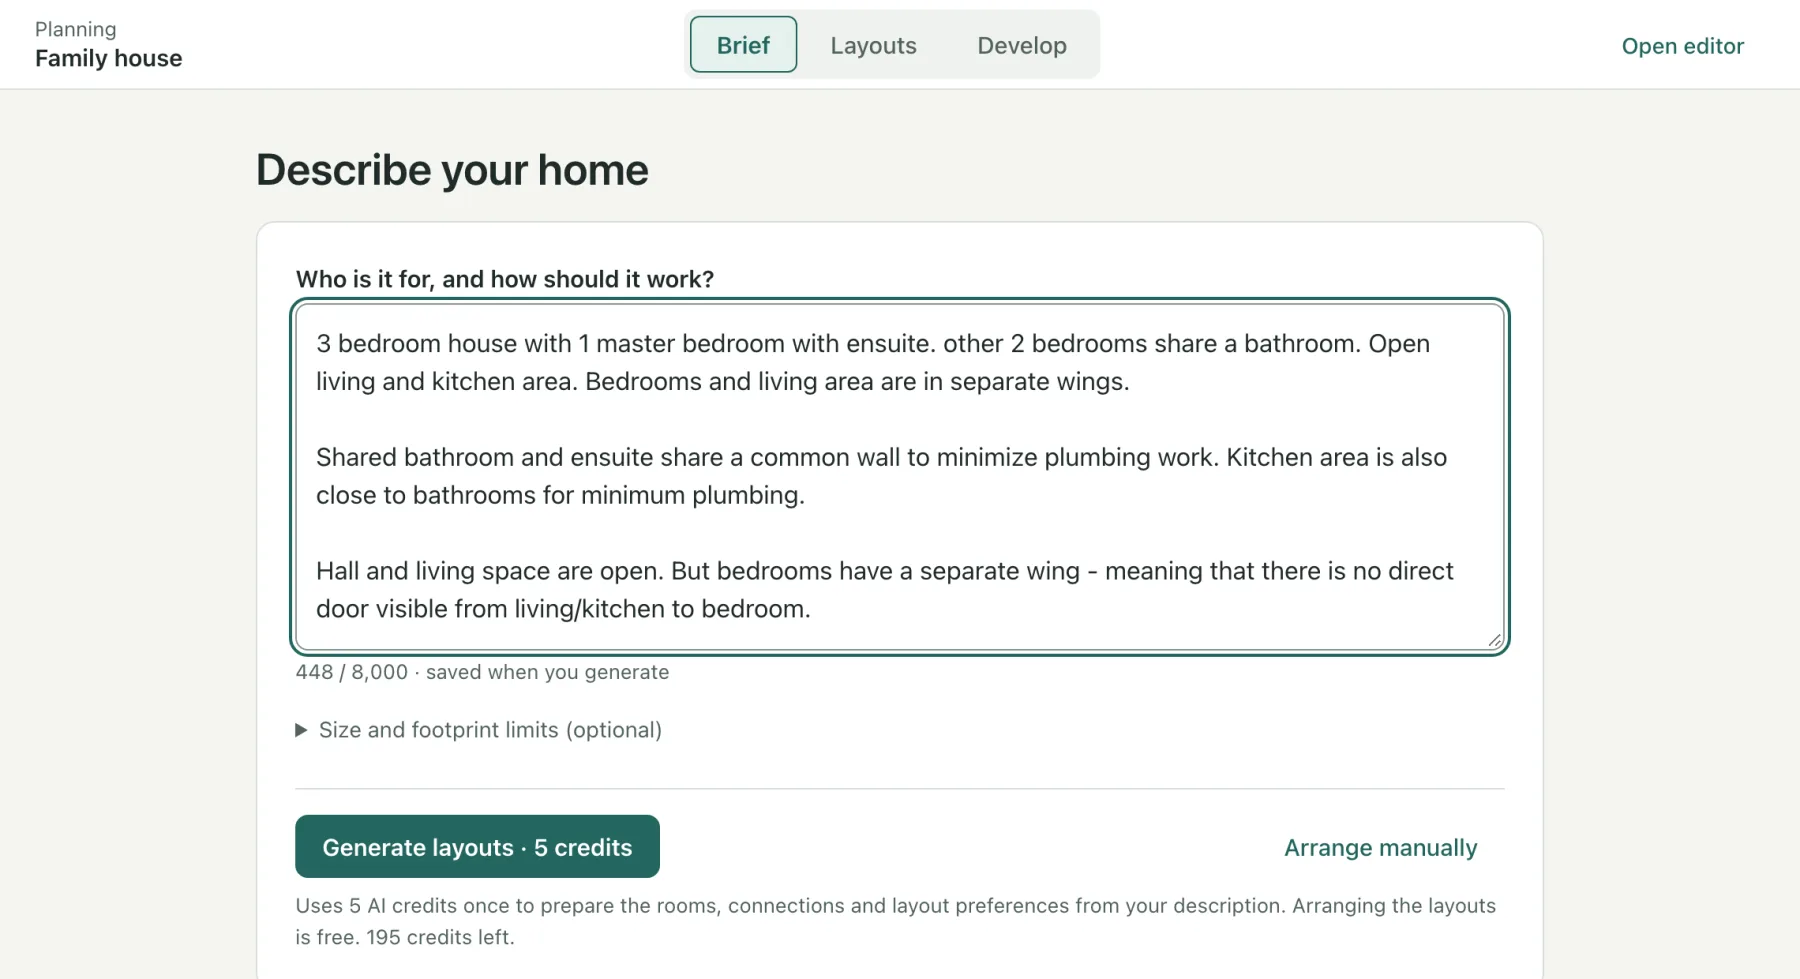
Write who the home is for and how it should work, the way you would brief an architect: the rooms, what sits next to what, what should stay private. Add a total area or a maximum footprint if you have one. One press of Generate layouts prepares everything else.
Compare layouts, adjust the requirements
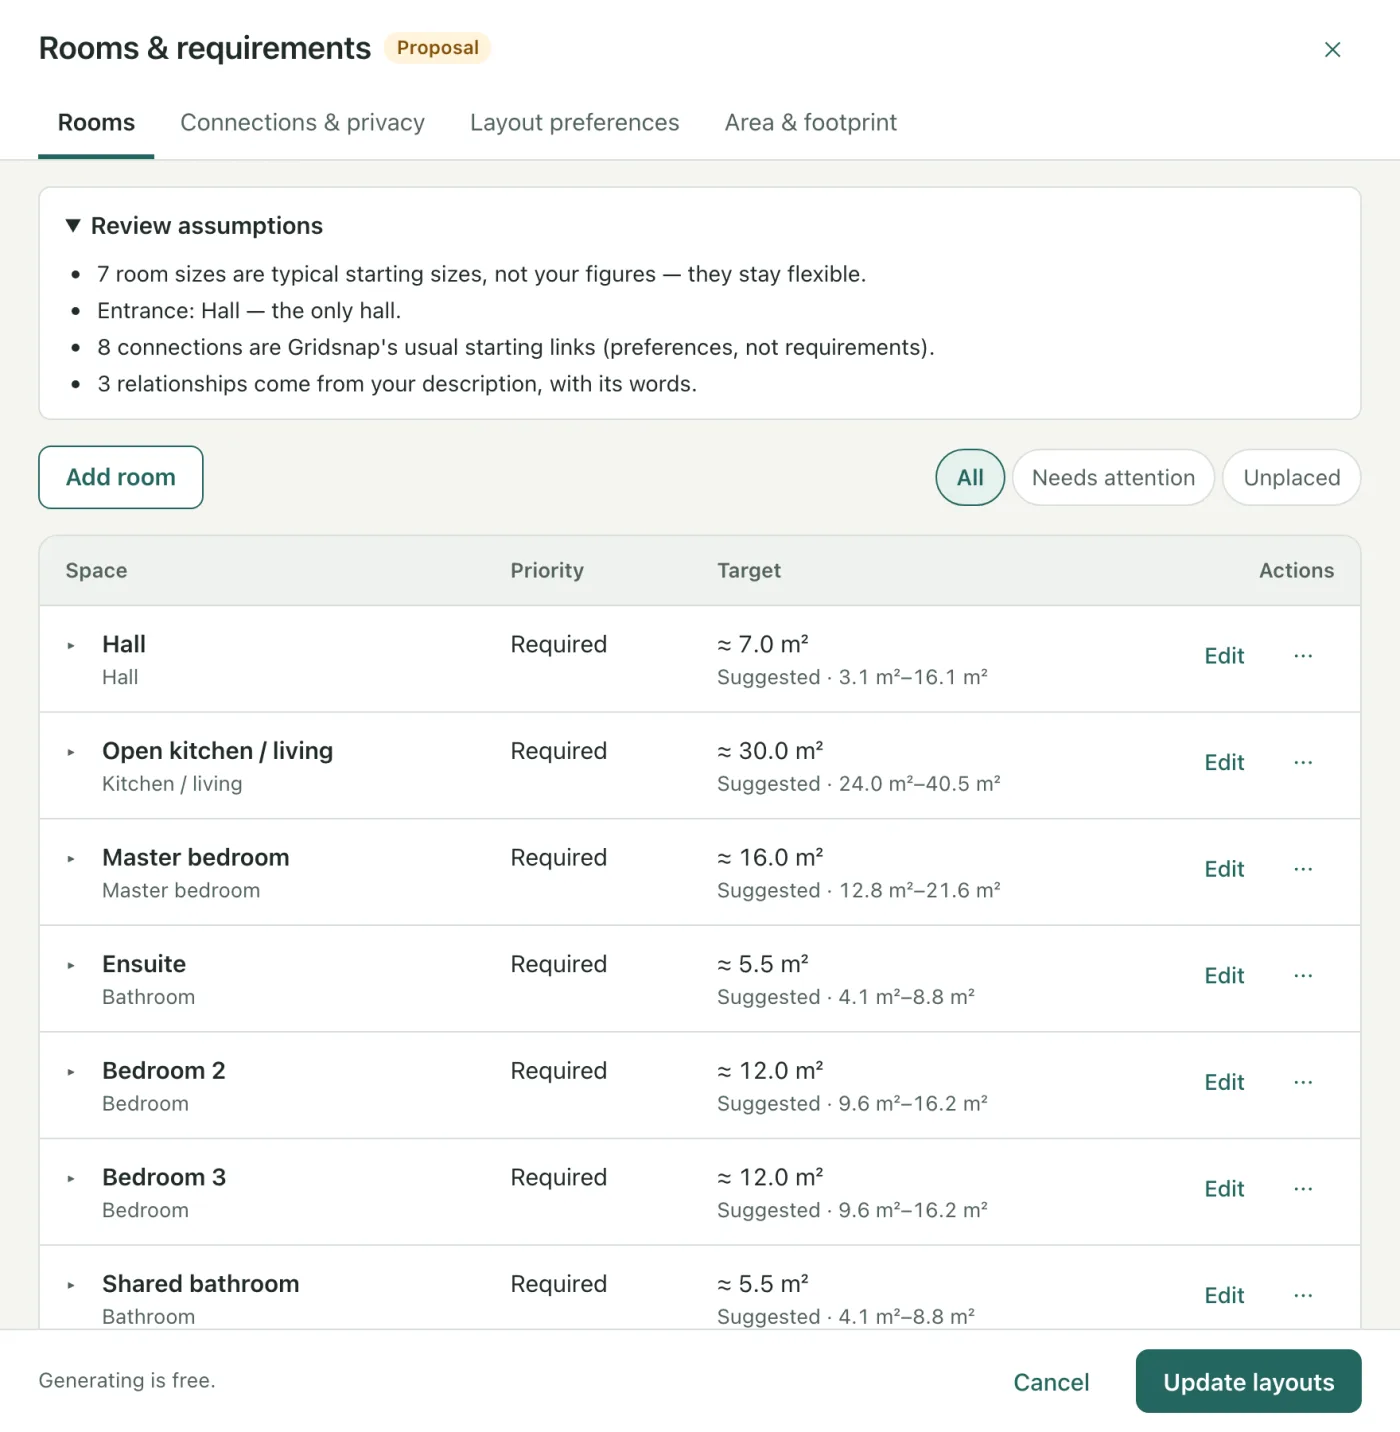
Your description becomes a list of rooms, each with a typical starting size that stays flexible until you type your own, plus the usual connections and the relationships your words state. The rooms are then arranged in your browser, and the building's outline follows the arrangement: a rectangle, an L or a U. Every layout is checked before you see it, and More layouts searches further. No credits are used. To change what the layouts are made from, open Rooms & requirements.
Nothing enters your project until you use a layout. Review assumptions lists what was decided for you: the typical sizes, the entrance, the starting links, and the words each relationship came from.
Without Pro, keep the room list and draw each space yourself in Develop: the same checks, the same Build, no layouts generated for you.
Refine the one you like, with the checks in view
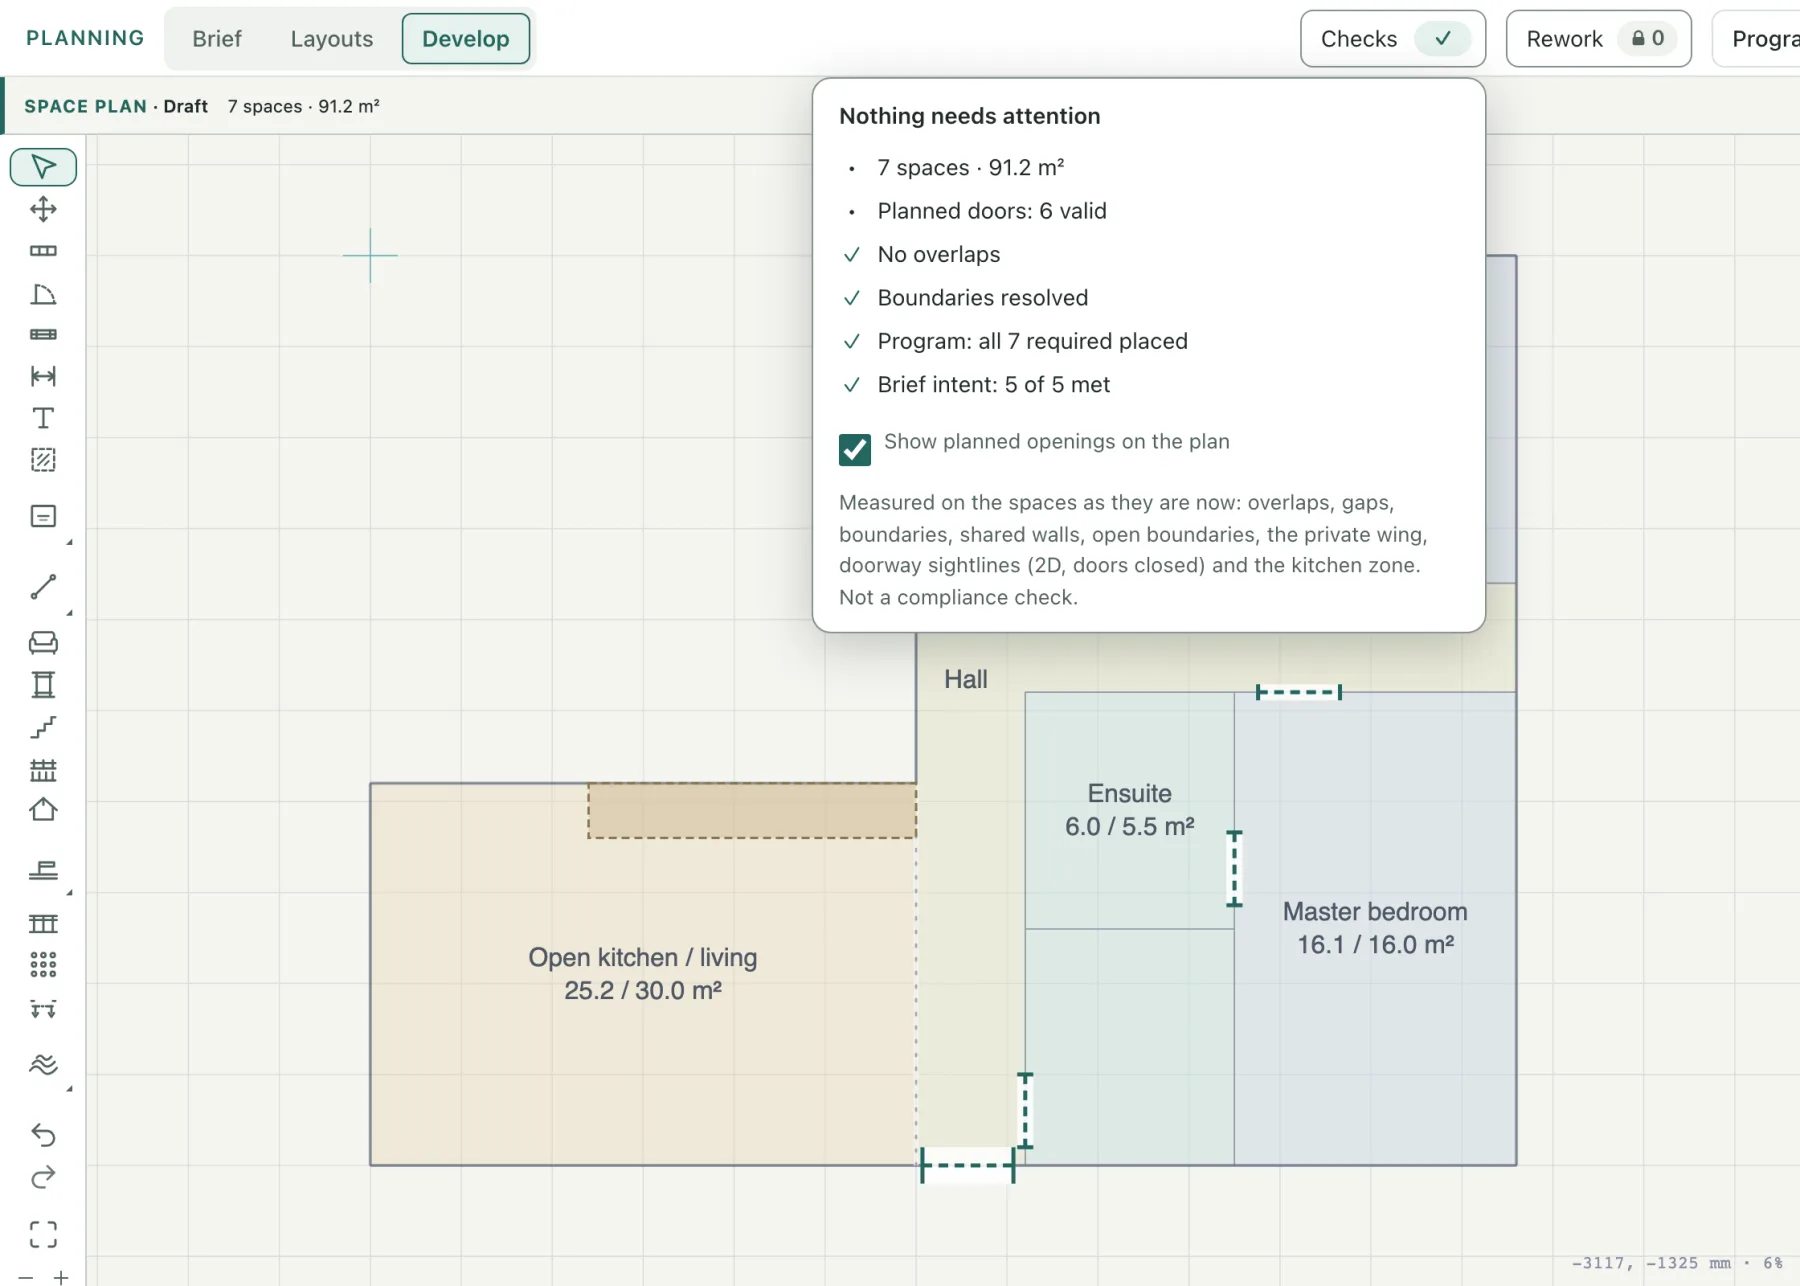
Use this layout and it becomes your draft: rooms as editable spaces on the plan, with their requirements attached. Drag a shared edge and one room gains exactly what the other gives. Checks stays in one place and says, as you edit, whether every room is still reachable, every boundary resolved and every part of the brief still met.
Measured on the spaces as they are, not a compliance check.
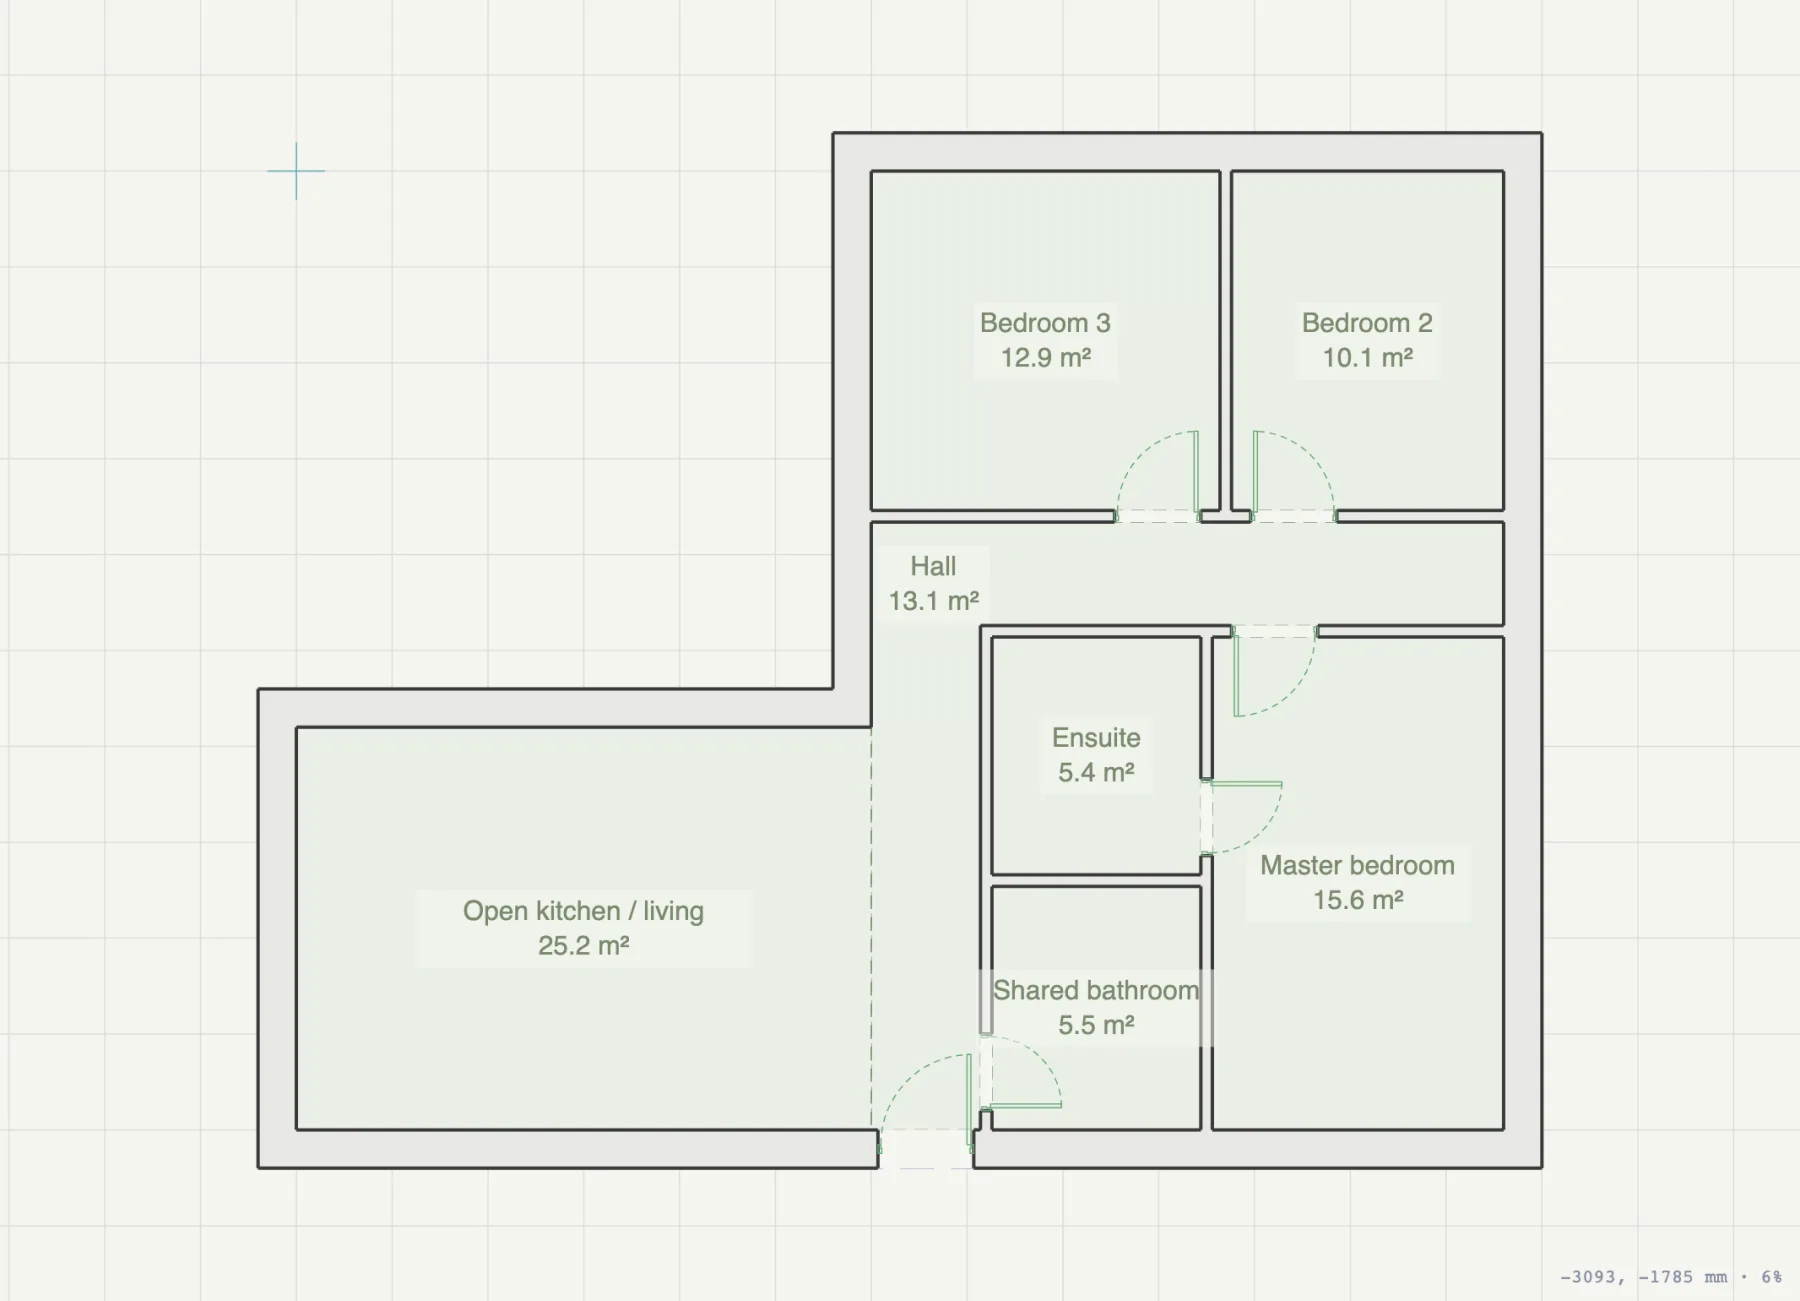
Build real walls, then keep drawing
Build plan turns the spaces into ordinary walls and named rooms in one undo step, and Place all puts a door in every planned doorway. From there it is the full editor: windows, furniture, roofs, more storeys, 3D, elevations and PDF, DWG or DXF export. The plan you started from is kept, so you can always come back and make a variation.
Plan the rooms before the walls, in 47 seconds
Brief, spaces, connections, layouts, refinement, walls. The whole method on one family home, with sound.
An animated overview of the method. In the editor the same steps live in three stages: Brief, Layouts and Develop.
A layout only reaches you once it passes
Every layout is evaluated from scratch on its final geometry. The checks that come from your brief are measured on the plan, not taken on trust.
- 01Every room reachable from the entrance
- 02A private room never the way into another
- 03Rooms and halls wide enough to use
- 04Every doorway on a wall the two rooms share
- 05Room sizes near their targets
- 06Sizes you typed held, suggested ones flexible
- 07Bathrooms back to back when you ask
- 08The kitchen where your brief puts it
- 09Doorways into a private wing out of sight
Use as much help as you want
The description is the quick way in, not the only one. Every part of the planning workspace works by hand, and the drafting editor is one click away.
Skip the description. Add the rooms you need with their sizes, or draw spaces straight on the plan as rectangles and polygons, sized against your list. Each shared boundary becomes a wall or stays open: you decide. This route is free; with Pro, Generate layouts arranges your list for you.
How the workspace works →Gridsnap is still the fast, precise drafting tool it always was. Click, type a length, press Enter: walls land at exact millimetres, rooms find themselves with their areas, and 3D and elevations come free. Trace over a scan when the building already exists.
Drafting features →Planning by hand is free. Generated layouts are Pro.
- Writing and editing the brief
- Adding rooms, sizes and connections
- Drawing and reshaping the spaces by hand
- Checks on access, boundaries and your room list
- Building the walls and placing the doors
- Everything in the drawing editor
- Generating layouts from your rooms, checked and compared side by side (no credits used)
- More layouts, and reworking part of a layout while keeping the rooms you like
- Reading your description into rooms, connections and preferences (5 AI credits each time it reads)
- Plus the rest of Pro: Options to compare, automatic dimensions, material quantities, unlimited synced projects
Space planning, answered
The step before walls, and why architects take it.
The whole method on one house, from brief to plan.
How a total area splits into rooms, halls and walls.
Circulation as a share of the plan, with worked numbers.
What is space planning?
Space planning is the step an architect takes before drawing walls: deciding which spaces a building needs, how big each should be, which ones belong together and how you move between them, then testing arrangements as simple blocks. Gridsnap's planning workspace does that for a home and then builds the result into a real floor plan. The method is explained in What is space planning?
Is this an AI floor plan generator?
Partly, and only where AI is good at the job. A language model reads your description into a room list. It never draws anything. The layouts come from a search that works in whole millimetres and checks every layout before you see it, and the plan you build is ordinary CAD geometry you can dimension, print to scale and export to DWG. More on that split on the AI floor plan generator page.
Do I need Pro or an account?
Not to plan by hand. Writing a brief, listing rooms with their sizes and connections, drawing the spaces, checking them and building the walls are all free and need no account. Generating layouts is part of Gridsnap Pro; it runs in your browser and uses no credits. Having AI read your description into rooms, connections and preferences is Pro too, and each read uses 5 AI credits.
Can I plan an extension or just part of a home?
Yes. In the brief's details, choose Only the spaces I specify and Gridsnap plans just the spaces you list, instead of completing a whole home with a kitchen, living space, bathroom and hall.
What if a layout is almost right?
Keep the rooms you like and rework the rest. A kept room holds its exact outline while the others are rearranged, and you compare the current and the proposed plan before applying the change as one undo step. Or simply edit the draft by hand: drag a shared edge and one room gains exactly what the other gives.
Can I give it a size limit?
Yes. Leave the footprint Flexible and the outline comes from the arrangement, or set a maximum outside width and depth. It is a limit, not a promise of a rectangle. If the rooms cannot fit, Gridsnap says so instead of quietly shrinking them.
What does it not do?
It plans one storey at a time, with straight walls. It arranges the rooms, builds the walls and places the doors; windows, furniture, roofs and further floors you add with the editor's tools. Its checks are about access, sizes and your brief, never building regulations, and a layout that passes them still needs your judgement.
Start with what the home needs.
Describe it in a few sentences, or list the rooms yourself. Draw the spaces and build the walls for free, or let Pro generate the layouts.