Draw each room as a Space: a rectangle or polygon with a name and a target size. Press Draw space on a room in the Space program panel, click a corner, type the width and depth, and press Enter. Then move edges and boundaries until the arrangement works. Everything on this page is free and needs no generated layout.
Start drawing spaces
Any of these opens Develop with the Space program panel on the left:
- Arrange manually on the Brief or Layouts stage.
- Draw the spaces on the Layouts stage, on the free plan.
- Save in Rooms & requirements, then Develop.
You can also draw without a list: the toolbar’s Space group has Space — rectangle, Space — polygon and Planning envelope, plus Space program, which opens the list. An unlinked Space takes its Type, Name and Target area from the properties panel.
Draw a space to an exact size
- In the Space program panel, press Draw space on a room. Gridsnap shows Drawing: Kitchen / living · Esc to cancel.
- Click the first corner on the plan.
- Type the width, press Tab, type the depth and press Enter. For example 6000, Tab, 5000 gives a 30.0 m² Space.
The Space takes the room’s name, type, target and minimum width, and the row changes from ✕ Not placed to In draft · Ground floor with its Planned area against the target. To draw a polygon instead, switch to Space — polygon, click each corner and click the first one again or press Enter. Esc cancels without drawing.
Start the next Space on a corner of the first one: corners and edges snap, so the two share an exact boundary.
Move and resize spaces
Switch to Select (V) and drag:
- a corner, to resize in both directions;
- an edge handle, to change one dimension (type an exact width or depth while dragging);
- the body, to move the Space;
- the ⇔ handle on a shared boundary, to give area to one Space and take it from the other in one move.
With a target set, an edge or a shared boundary can snap where the target is reached. Double-click a Space for Edit shape, which adds, moves or removes single corners. The properties panel shows the Current area, the Difference from the target and Set target to current.
Draw an envelope
A Planning envelope is the region the Spaces should fill, such as the inside of a fixed footprint. Choose Planning envelope in the Space group and click its corners (or type each edge’s length and angle), then close it on the first point or press Enter.
Once it exists, the summary in the properties panel reports how much is Unassigned inside it and any Space area Outside envelope. In the example below, two Spaces of 42.0 m² in a 54.0 m² envelope leave 12.0 m² unassigned.
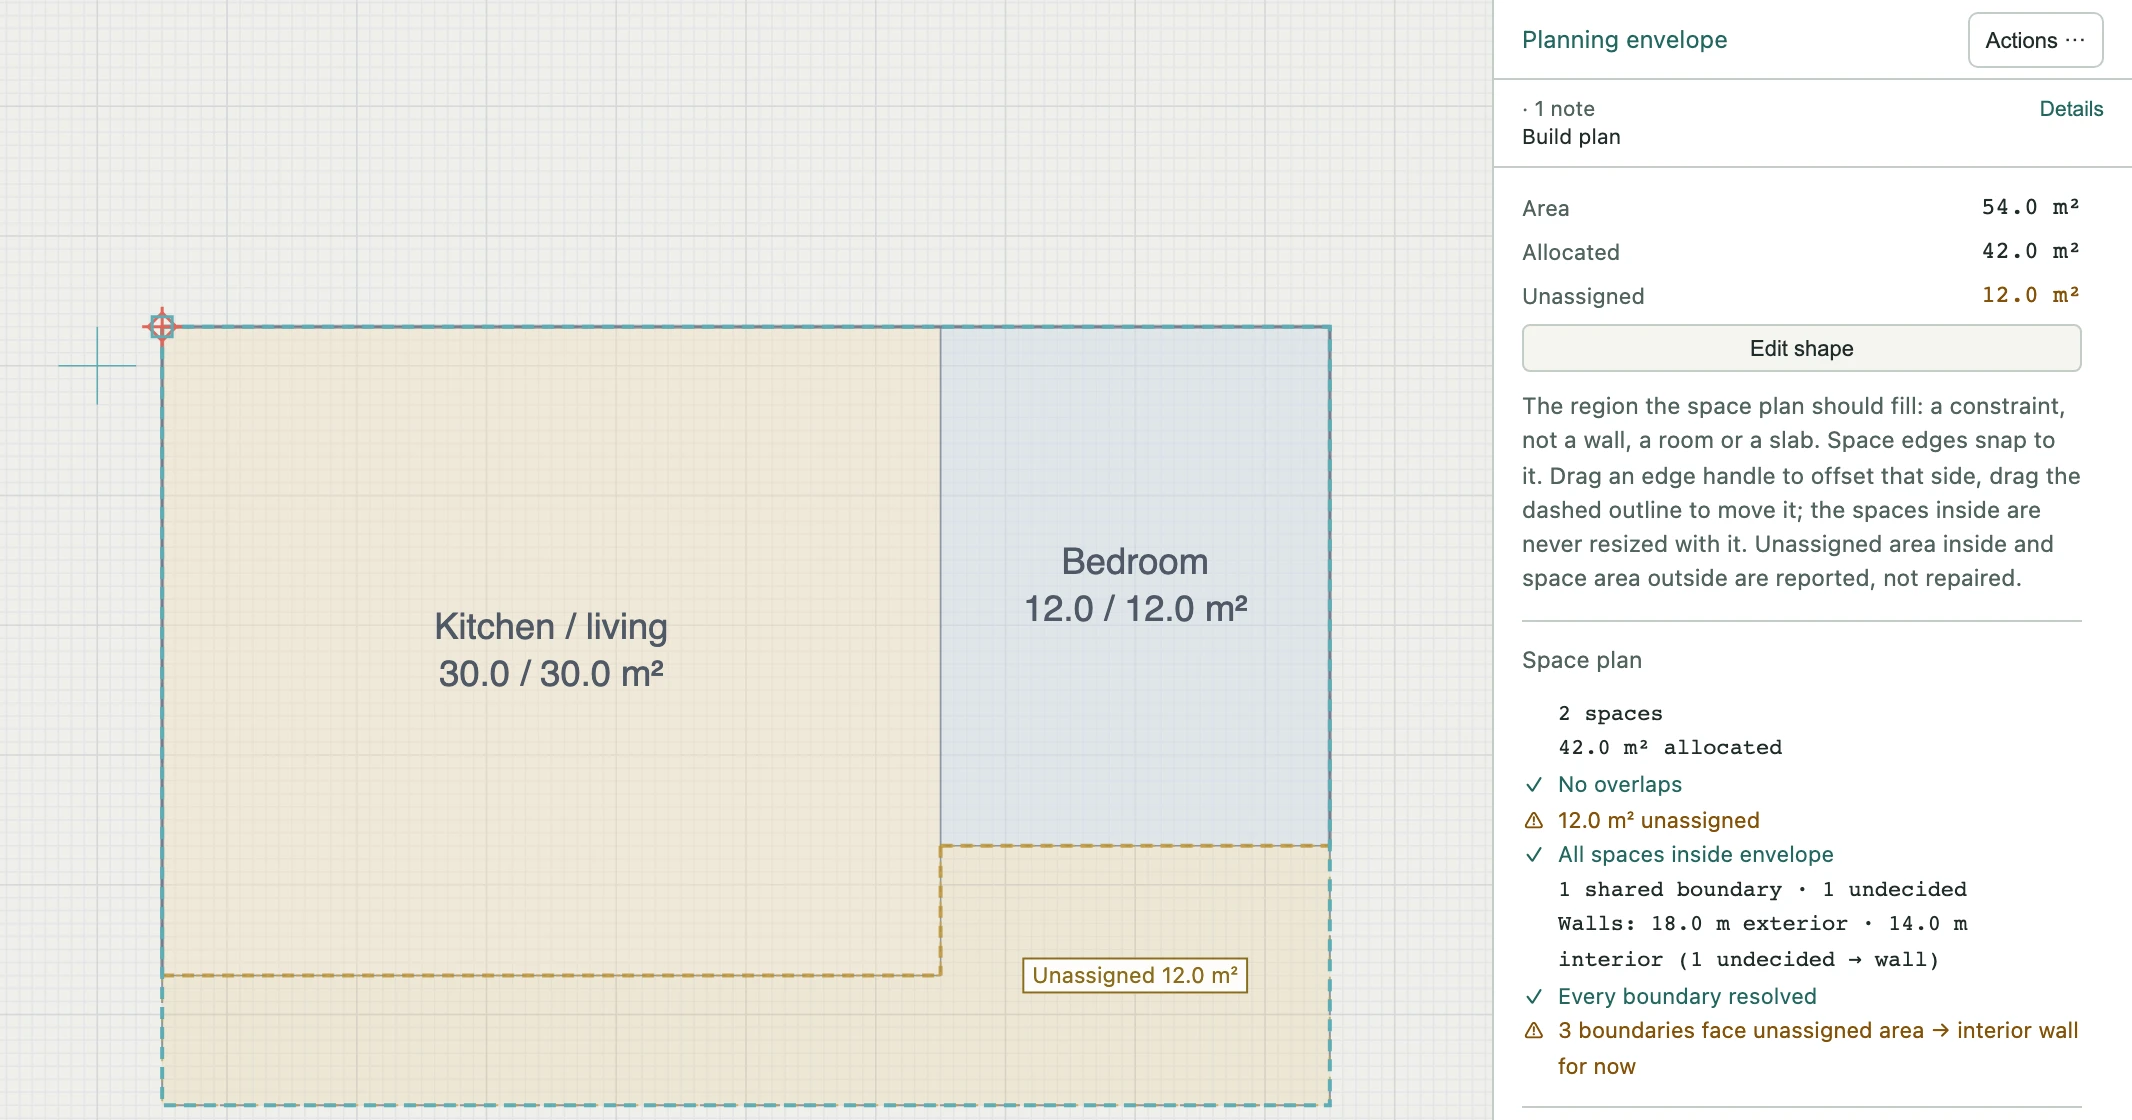
An envelope does not clip, fill or resize anything, and it is not a wall. Its edge is the inside face of the exterior walls Build will make. It is also not the footprint limit for generated layouts, which is a maximum outside size set in Area and footprint; using a generated layout replaces a drawn envelope.
Unassigned area changes what Build makes. A boundary that faces unassigned area becomes an interior wall for now, and an exterior wall stops where unassigned area meets the envelope edge. The summary says so before you build. Give that area to a Space, or draw those walls yourself afterwards.
Decide the shared boundaries
Select a Space to see its Boundaries. Each run it shares with a neighbour has three choices:
- Auto — no decision yet; builds as an interior wall for now.
- Wall — build an interior wall.
- Open — build no wall, so the two Spaces become one room with an area for each.
Click a boundary row to highlight the run on the plan, click the ⇔ handle to select it, or double-click the handle to cycle through the three. Resolve overlaps first: a boundary inside an overlap cannot be set until the overlap is gone.
Read Checks before you build
Checks in the planning band counts what needs attention and opens a list over the plan without moving it: overlaps, gaps, boundaries still to decide, rooms not placed, connections, planned openings and any layout intent you set. It reads ”…” while you drag and updates when you let go.
Two kinds of finding differ. An overlap or an unreadable outline blocks Build plan and is marked ✕ in the summary. Unassigned area and Auto boundaries are warnings; you can build with them if they are deliberate.
What this doesn’t do
- A Space is planning geometry. It is not a room, it is not in quantities or schedules, and Drawing’s Plan check does not read it.
- Minimum width is measured only on rectangles. Other shapes read Width not checked for this shape — review manually.
- Checks are 2D measurements of the drawing, not a compliance review.