Press W — or click the wall icon in the toolbar down the left edge — then click where the wall starts and click where it ends. Every further click draws another wall from the last corner, so a whole outline is one run of clicks. Press Enter or Esc, or double-click, to finish. Drawing is free and needs no account.
Step by step
- Pick the wall tool. Press W, or click the wall icon in the toolbar down the left edge of the window. A new plan opens with the Select tool active, so this is always your first move.
- Click the start point. Nothing is drawn by that click on its own — it only marks where the run begins.
- Click the end point. The wall appears between the two clicks, and the chain carries on from the corner you just made.
- Keep clicking for each corner. The strip at the bottom of the window tells you what the tool will do next: “Click to place · or type an exact length (Tab = angle, Enter places) · Shift locks to 45° · ⌘Z takes the last wall back · Enter/Esc finishes”.
- Finish. Press Enter or Esc, or double-click. To close a loop, click back on the first corner instead — a ring appears under the cursor when you are close enough, and the closing wall lands exactly on that point.
Getting the wall straight
Hold Shift while you place the second point and the direction locks to the nearest 45°. Without it, walls still come out square far more often than not: when nothing more specific is under the cursor, the editor prefers an exact horizontal, vertical or 45° direction from the last corner over a raw grid point, provided the cursor is within about 12 pixels and 8° of that line.
Grid snapping is on by default (toggle it with G; the bottom-right of the window reads snap on (G)), and the grid is 100 mm in both directions unless the plan says otherwise. One thing to know about it: the grid snaps positions, not lengths. A wall drawn at a free angle has both ends on the grid and a length that is whatever it is. If you want exactly 10 m, hold Shift or type the length.
Typing an exact length
While a run is in progress, just start typing a number. It goes into the
Length field of the little readout that follows the cursor, and
Enter places the point there. Tab switches to the
Angle field, so 3600 Tab 90 Enter is a 3.6 m wall
going straight up the screen.
Bare numbers are millimetres. 2.5m, 250cm and 2500mm all work and all mean
the same wall. Angles are in degrees with 0° pointing right and 90° up.
This has a page of its own — see drawing to an exact length.
Changing your mind mid-run
⌘Z (Ctrl+Z on Windows) takes back the last wall and leaves you drawing from the corner before it, so a bad click costs one keystroke rather than the whole run. ⇧⌘Z puts it back. Once the run is exhausted the same key goes back to being ordinary undo.
Esc unwinds one level at a time: first any number you have typed, then the run itself.
Thickness, height and wall type
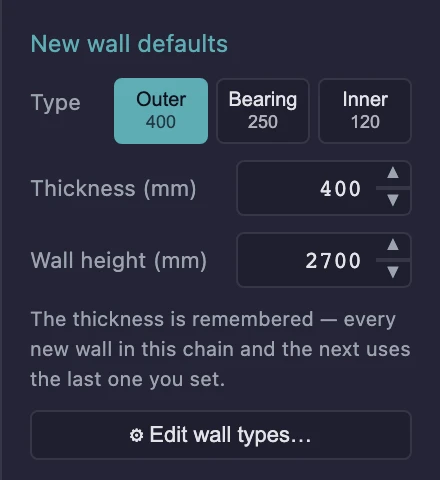
Set these before you draw — they apply to the next wall, not the selected one. With the wall tool active, the properties panel on the right shows New wall defaults:
| Control | What it does |
|---|---|
| Type | Three presets — Outer, Bearing, Inner. The default values are 400 / 250 / 120 mm. |
| Thickness | Any value in millimetres, if none of the presets is what you build. |
| Wall height | The storey’s default wall height, used by 3D and the elevations. |
The thickness you last used is remembered — for the next wall, the next run, and the next time you open the editor in that browser. Before you have ever set one, it starts on the Outer value, on the assumption that the first wall you draw is the envelope.
Those three preset values are settings, not fixed constants, because wall build-up is regional: an Austrian envelope is 400–500 mm where a Nordic timber one is 250. Change them under ⚙ Edit wall types… in the panel (or the ⚙ drawing settings), and they stick for every plan you draw.
Walls join themselves
Walls are drawn as centrelines and the corners are worked out for you: mitred at a corner, fused at a T-junction, merged where two parallel walls run flush. You do not have to land exactly on an existing wall’s node — a T-joint forms whether you butt onto the face, overshoot slightly, or stop up to about a millimetre short. That is also why the closing click of a loop snaps onto the first point exactly rather than near it.
What this doesn’t do
- Walls are straight. There are no curved or arced walls. A curve has to be drawn as a run of short straight segments, and the plan check will not understand it as one wall.
- One thickness per wall. Thickness is a property of the whole wall, so a wall that changes section has to be drawn as two walls.
- Millimetres only. There is no feet-and-inches mode yet — see does Gridsnap support feet and inches?
Next
Once the outline is standing, put the holes in it: see how to add doors and windows. If you would rather read the whole method end to end — measuring the real building, drawing it, printing it to scale — the long-form how to draw a floor plan guide covers it.