A room kit is a set of finishes chosen to go together: a floor, a wall paint or plaster, an accent colour, cabinet fronts, worktops, taps and handles, upholstery, bedding, wood and metal for the furniture. Applying one finishes what your rooms already have in a single step, instead of picking each material in turn.
Kits live in the Finishes activity, under Room kits. There are three:
| Kit | What it uses |
|---|---|
| Warm oak | Oak boards, warm white paint with a terracotta accent, solid oak fronts and furniture, white quartz, brushed brass and oatmeal fabric |
| Light mineral | Large gray tile, microcement walls with a sage accent, pale grey fronts, white marble, chrome, ash and ivory bouclé |
| Soft contrast | Oak herringbone, greige paint with a navy accent, graphite fronts, dark granite, walnut, dark metal and camel corduroy |
Browse a kit (free)
Click a kit to open it in the panel. It shows an example room in its materials and lists every material against the part it goes on. Browsing is free, and so is finishing rooms one material at a time with the library and Paint.
Preview it in your project (Pro)
Preview in my project opens the review. Tick the rooms to finish: a room you had selected is ticked already. While the review is open the plan shows the Textured style, and Original and Proposed switch the plan and the 3D view between your project as it is and as it would be, at the same camera. Nothing is changed until you apply.
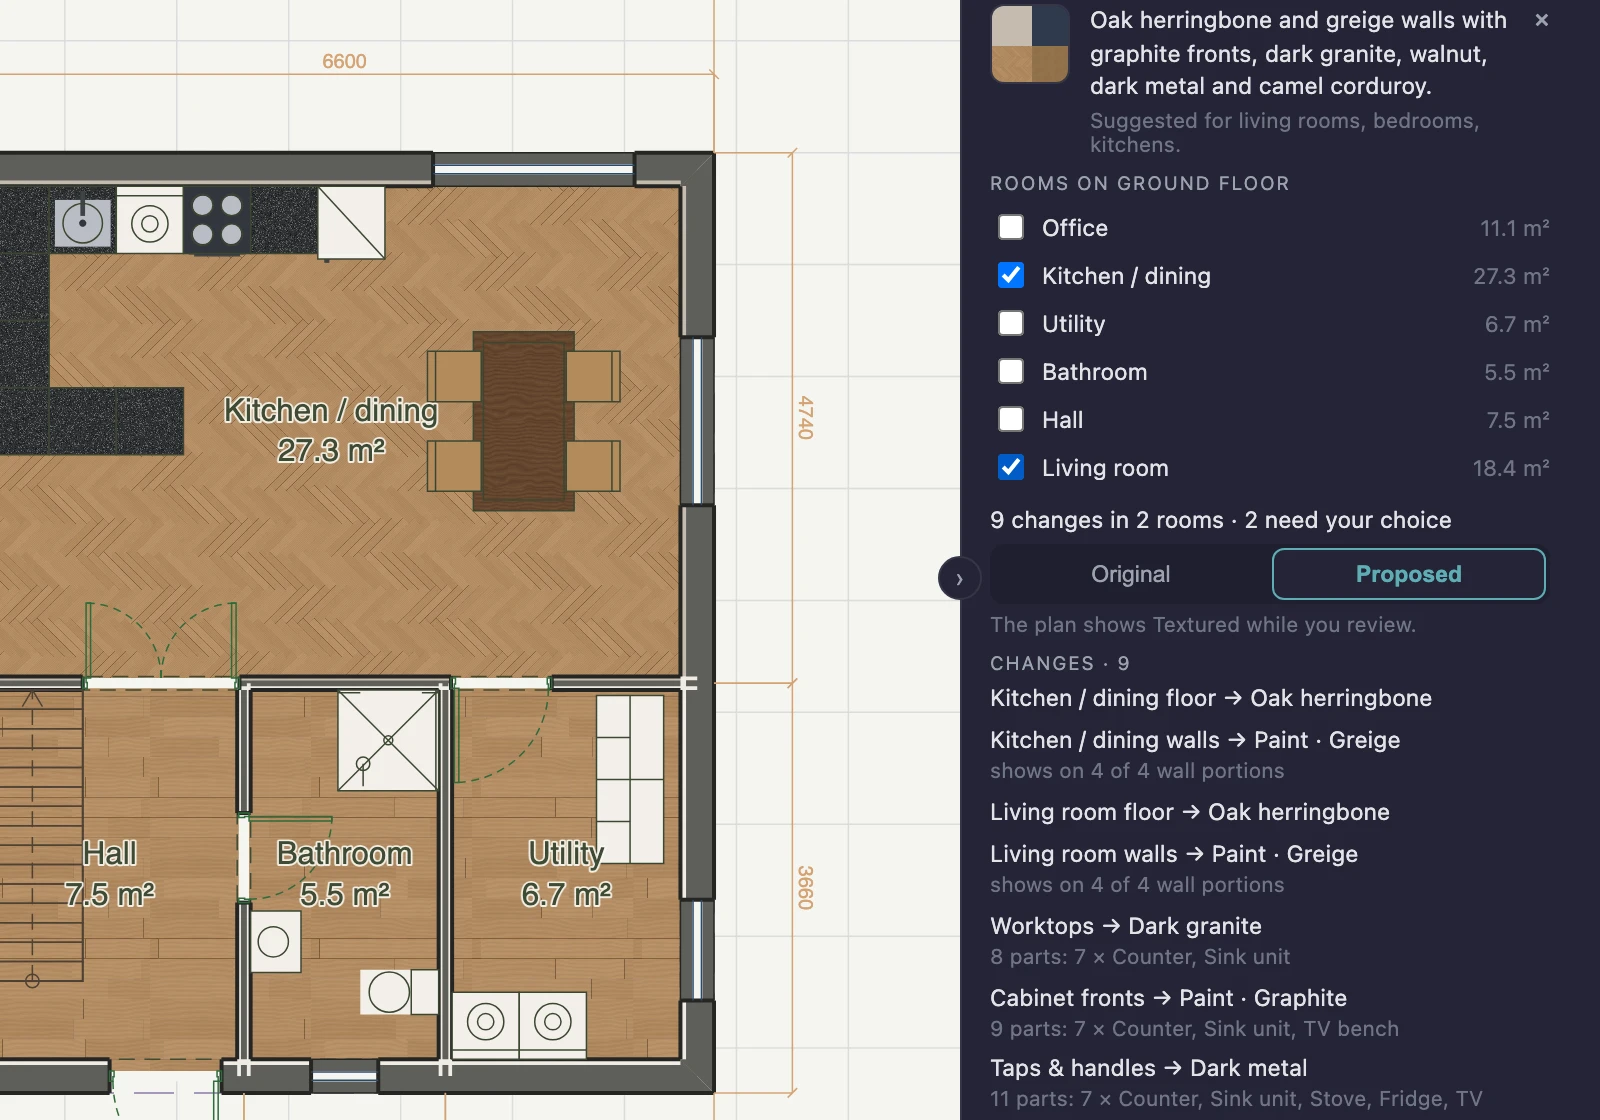
The review is in four parts:
- Changes: each room’s floor and walls, and the furniture parts the kit finishes, with how much of each will show. A floor with a finish area on it says what share the kit’s floor covers; walls with their own finish say how many portions the kit’s wall finish reaches.
- Needs your choice: the accent goes only on a wall you pick from the list. An item that stands partly outside the ticked rooms, such as a rug across a doorway, is included only if you tick it.
- Preserves: finish areas, accent walls, wall faces you finished yourself, and furniture parts that already have their own finish stay as they are. Tick Also replace furniture parts that have their own finish to replace those parts too.
- Skips: parts no kit covers, such as sanitary ware, appliance casings or a heat pump, keep their own look.
Apply writes the listed changes as one step: Undo puts back every finish it changed. If the project changes while the review is open, the list is updated and says so; it is never applied to something it no longer describes.
Save your own kits (Pro)
Under Your kits, Save a room as kit… reads the finishes a room already has and turns them into a kit you can use on other rooms and in other projects. Choose the room, and each part of the kit lists the materials found there: the floor (and any finish area on it), the walls, an accent wall, and the finishes on the furniture that stands in the room.
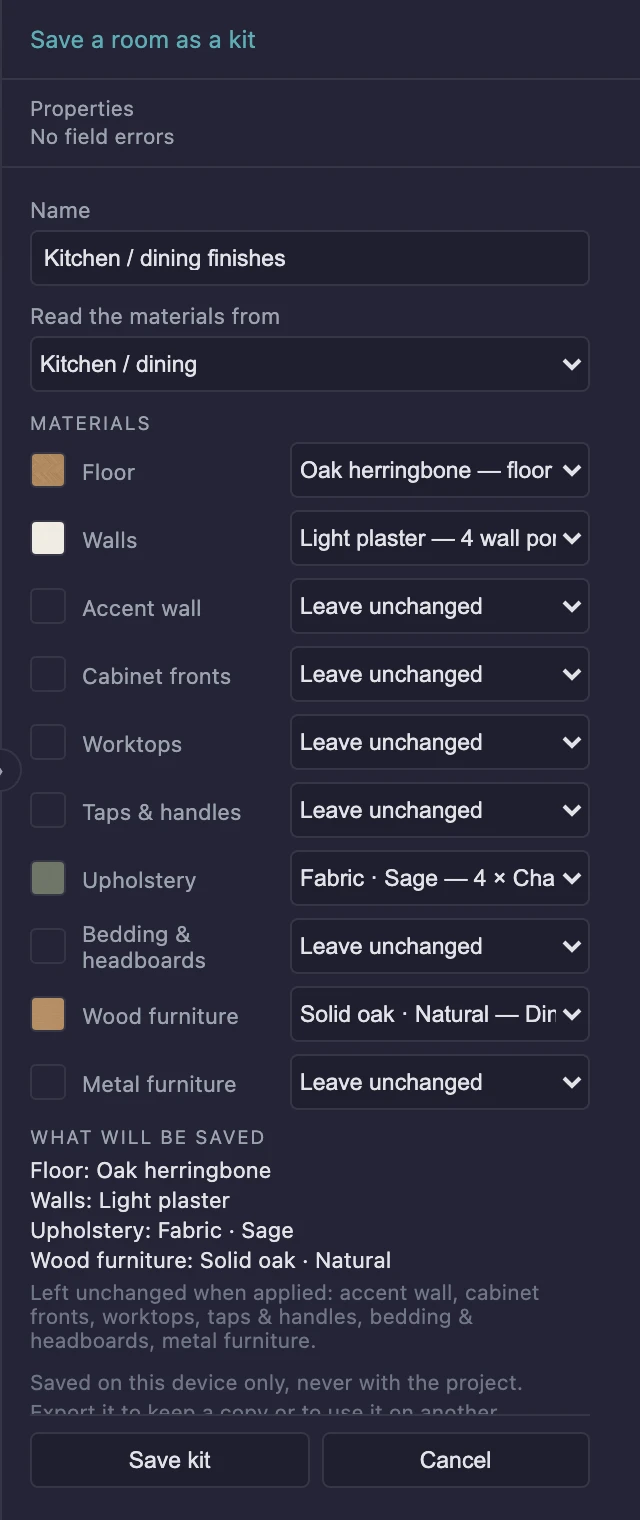
- A part with one material in the room is filled in for you.
- A part with several, such as a sofa in leather beside chairs in fabric, asks you to pick one, or to choose Leave unchanged. The kit is not saved until every part is decided.
- A part the room does not have stays Leave unchanged, and you can pick any suitable material from the library instead.
- What will be saved lists exactly what goes into the kit.
Your kit then sits beside the three bundled ones, and Preview in my project works for it exactly as above, with the same review and the same single Undo.
Edit… changes a kit’s name or materials and saves it as a new revision. Rooms you already finished with an earlier revision keep their finishes: a kit is never linked to the rooms it was applied to. Earlier revisions lists the old ones, and Make current brings one back as the newest revision.
Kept on this device
Your kits are saved in this browser, on this device, and never with the
project or in your account. Export downloads a kit, with all its
revisions, as a .gridsnap-kits.json file; Export all does every kit at
once. Import… adds kits from such a file: a kit you already have is
brought up to date with any newer revisions, and if the file and this device
disagree about a revision, the file’s version comes in as a copy rather than
replacing yours. Clearing the browser’s site data deletes the kits stored
there, so export the ones you want to keep.
Saving, editing and importing kits need Pro. Without it you can still open your kits, export them and delete them.
What a kit does not do
A kit sets finishes only. It adds no furniture, changes no wall, floor or build-up, and leaves the project’s default finishes and the outside faces of the building alone. Floors keep their pattern direction. After applying, the finishes are ordinary ones: change any of them in the panel, free, and they appear in the finish schedule like any other.