The 3D view is built from the same document as the plan — there is nothing to generate and nothing to keep in step. Whatever you draw is standing there when you switch to it, and it is free.
The three styles
A style re-dresses the scene. It never changes what is built, and never changes the document.
| Mode | What it is for |
|---|---|
| Diagram | The working view: real colours, flat light, no shadows or effects. A finish shows as its plain colour. One render pass — the fast one to draw in. |
| Clay | A single-material mock-up: one clay tone, furnishing hidden, form from occlusion and outline alone. For reading the structure without the detail. |
| Realistic | The presentation view: finishes textured at their real size, image-based light with sun and soft shadows, ambient occlusion and drawn outlines. The one to screenshot. |
With Realistic, Light offers Daylight, the building lit on its site, or Interior, a softer and warmer light for looking into rooms.
The view renders on demand rather than continuously, so even Realistic costs nothing while you sit and look at it.
Finishes
Floors, wall faces, furniture parts, doors, windows and stairs can each have a finish from Gridsnap’s material library: oak boards, herringbone, tile, plaster, brick, fabrics and more. Choose one in the Finishes activity, from the Floors, Walls or Furniture shelf, and click with Paint on the surface or part you want. Paint works in the 3D view as well as in plan. To finish a whole room at once, a room kit sets its floor, walls and furniture finishes together (Pro).
A finish is part of the document, so it is the same in every view: textured in Realistic, a plain colour in Diagram, and washed out in Clay. The plan shows it in its Textured style, which also exports to PNG and PDF (see exporting a PDF). A finish is a look only: it changes no dimension, wall build-up or quantity.
Seeing into the building
- Hide roof takes the roof off and puts it back. A hidden roof still casts its shadow, so the light on the walls stays honest.
- All floors shows the whole building. The other button reads Up to <floor> and builds every storey from the bottom up to the one you are on — because a single storey rendered alone floats over the site with nothing under it, and loses the stairs, which belong to the floor below.
- Ground reads Solid, Grid or Off. Solid is the opaque site surface at the ground level; Grid puts a 1 m grid there instead, so a basement, a foundation or a sunken terrace is visible while the ground level still reads; Off leaves the building on its own.
- Fit view re-frames the whole model.
Choosing the active floor and choosing how much of the building to see are separate decisions: switching floors on the plan does not change what 3D shows, and it does not re-frame the camera.
Selecting in 3D
Click a wall, a door, a window or a piece of furniture and it selects — the properties panel edits it exactly as it would in plan. Picking never moves the active storey. The 3D shows the whole building at once, so a click here does not make the plan, the panel and the floor selector jump: something on another floor is selected where it stands, and the panel, Backspace and the arrow keys all act there. The panel names that storey when it is not the one you were working on.
Shift-click adds to the selection, and shift-clicking something already in it takes it back out. A shift-click on another storey’s object starts a fresh selection there instead: an edit resolves to one storey, so a selection spanning two would only be half editable.
Placing a stair selects it, the way a drawn floor or a guarding run is selected, because where it lands, its well and how it is built are all panel decisions.
Furniture and stairs can be dragged in 3D with the transform gizmo. With several items selected the handles move all of them together, keeping their spacing exactly.
Scrolling zooms towards the cursor, so the wheel takes you to the thing you are pointing at and panning keeps working at any zoom.
The walkthrough
Walk through puts you inside the building at eye height, first person.
- W A S D to walk, mouse to look, Shift to move faster.
- Click a door to open or close it as you reach it.
- Set start point / Move start point puts the door you walk in from where you want it; double-clicking a spot first also sets it.
- Exit walkthrough returns you to the orbit camera.
Saved views
Save the views you want to revisit. Arrange the camera, then open Views in the 3D view’s top row and choose Save current view. Type a name (or keep View 1) and press Enter; Esc cancels.
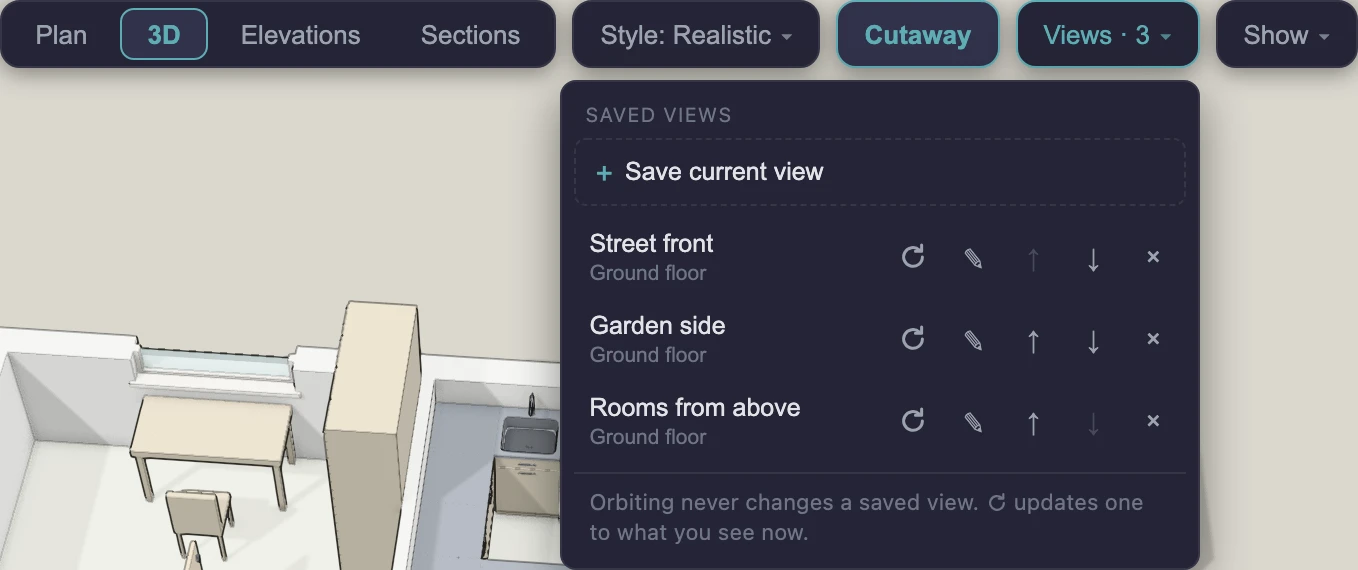
A saved view keeps:
- the camera: where it stands, what it looks at and its field of view;
- the storey you were on, which is where Cutaway and Up to <floor> cut;
- the style and, in Realistic, the light;
- what Show was set to: the ground, all floors or up to this one, the roof, and Cutaway.
Click a name to go back to it. That changes only what you are looking at: it is not an edit and leaves nothing to undo. Orbiting, panning and zooming never change a saved view either. To change one, set the camera up again and click Update (the circular arrow) on its row. The row’s other buttons rename it, move it up or down the list, and delete it. Saving, updating, renaming, reordering and deleting are each one step you can undo.
Saved views are part of the project. They are in the file, in your cloud project and its history, in a share link (where anyone with the link can click them, but not change them), in a duplicated project and in a design option. They are free and need no account.
A saved view shows the design as it is now, not as it was when you saved it: move a wall or change a finish and the view shows the change. Delete the storey a view was saved on and the view says Unavailable: its storey was deleted; Attach to <floor> points it at the storey you are on, keeping its camera. On a screen of another shape the view keeps its height of view and shows more or less at the sides.
The camera remembers
Switching between plan, elevations and 3D returns you to the same viewpoint without saving anything. Loading a different plan re-frames.
Overhead render
Export a furnished overhead view with materials and shadows. In Export, under the other formats, choose Overhead render…: a lit 3D image of one storey seen from straight above, as a PNG or as a one-page PDF sheet. It is free.
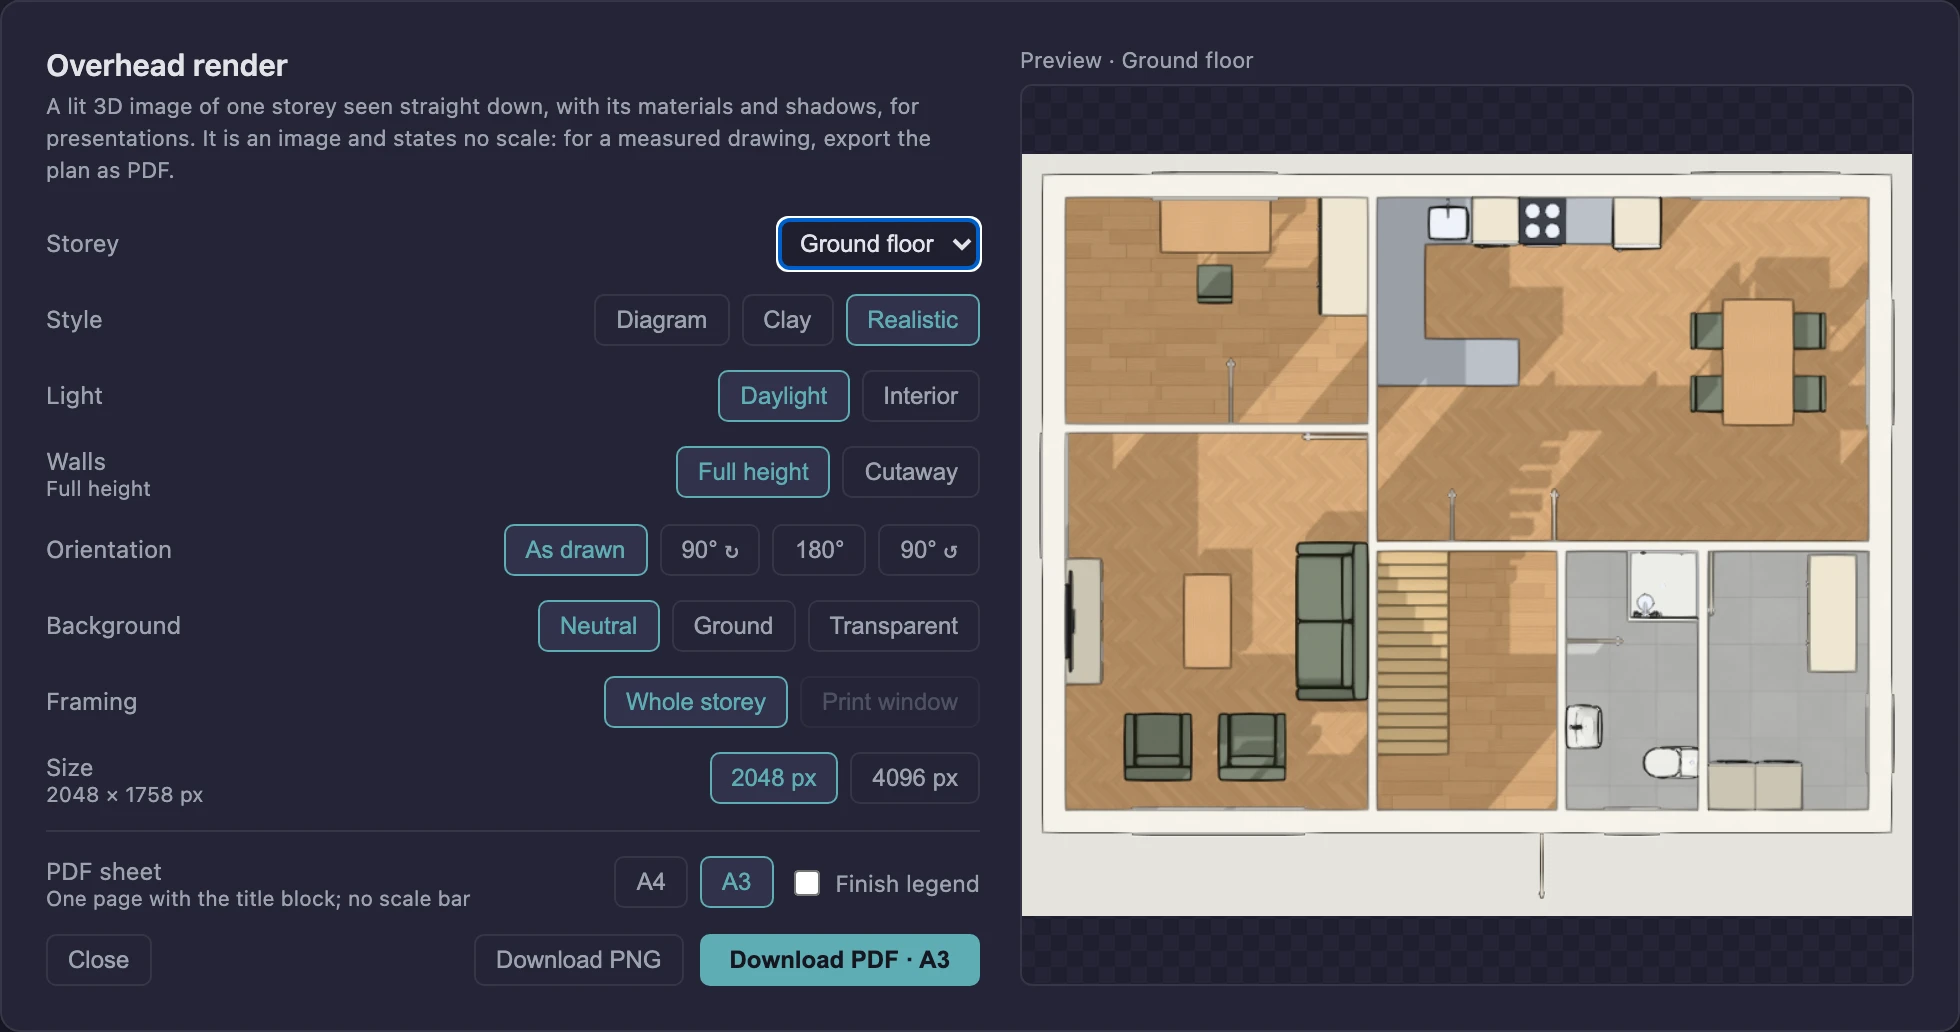
- Storey: the storey and everything under it. Its roof and ceilings are left off, and nothing above it is drawn, so you look down into the rooms.
- Style and Light: Diagram, Clay or Realistic, and in Realistic Daylight or Interior, the same as in the 3D view.
- Walls: Full height, or Cutaway, cut at 1.2 m as on the plan.
- Orientation: as drawn, or turned a quarter, half or three quarters.
- Background: Neutral (the style’s paper colour), Ground (the site surface, with the building’s shadow on it) or Transparent (a PNG with transparency).
- Framing: the whole storey, or the print window you chose in Export.
- Size: 2048 px or 4096 px along the long edge. The dialog states the exact size. A device set to Reduced 3D quality, or one reporting less than 4 GB of memory, is offered 2048 px and is told why.
- Start from: the 3D view’s current settings, or one of your saved views: its storey, style, light and cutaway, and Facing the view, which turns the image so the view’s direction points up.
The preview on the right is made the same way as the download, only smaller. While the image is made the dialog shows its progress (loading finishes, rendering tiles) and Cancel stops it, with nothing downloaded. If a finish’s texture could not be loaded, the dialog names it and offers Retry, Export with plain colours or Cancel, rather than quietly saving a plain-coloured image. Making the image never moves your 3D camera or changes the drawing.
The PDF is one A4 or A3 page with the usual frame and title block, “Overhead render · <storey>”, and “Presentation image — not to scale” where a drawing states its scale. Tick Finish legend to list the storey’s finishes beside the image, with the same codes as the plan’s legend. It is an image on a page: for a drawing you can measure, export the plan as PDF, Technical or Textured.
What this doesn’t do
- Library materials only. You cannot bring in a texture image of your own.
- No light fixtures or bounced light. Realistic is lit by its environment and the sun; Interior is an approximation, not a daylight simulation, and lamps you place do not give light. The sun is not aimed by the north arrow.
- The ground plane does not hide what is under it in Clay and Realistic: a footing below the ground level shows through. Switch Ground to Grid or Off, or use Diagram, which is correct.
- No 3D model export. There is no OBJ, glTF or IFC out. The one image export rendered from the model is the overhead render, from straight above. On Pro, an AI presentation image can be made from any 3D or saved view; it is AI-generated, so details may differ from your design.
- The overhead render is not a scaled drawing: it has no scale bar and no dimensions, and it has no photographic lighting (no bounced light, no sun aimed by the north arrow).
- Saved views stay in their project. You cannot copy one into another plan.
Next
Elevations for the drawn version of the same building.